

Introduction
In recent years, sushi-inspired dishes have taken the culinary world by storm, captivating food lovers with their unique flavors and delightful presentations. Among these, Salmon Crispy Rice has emerged as a standout favorite, seamlessly blending the traditional elements of sushi with innovative twists. This dish features perfectly cooked salmon nestled atop crispy sushi rice, creating a harmonious balance of textures and flavors that is both satisfying and visually enticing. Whether served as an appetizer or a main course, Salmon Crispy Rice offers a delightful explosion of taste that appeals to sushi enthusiasts and newcomers alike.
The allure of Salmon Crispy Rice lies in its ability to combine the soft and chewy nature of sushi rice with the crispy exterior of the rice base, topped with the rich, buttery flavor of fresh salmon. This dish not only highlights the artistry of Japanese cuisine but also showcases the creativity that can be found in modern fusion cooking. As we delve deeper into the preparation of this delicious recipe, you will discover how each ingredient plays a crucial role in crafting this delectable dish.
Understanding the Ingredients
To create a successful Salmon Crispy Rice, it is essential to understand the ingredients that form the foundation of this dish. Each component contributes to the overall flavor profile, texture, and nutritional benefits.
Sushi Rice: The Core of the Dish
At the heart of any sushi dish is the rice, and for Salmon Crispy Rice, the choice of sushi rice is paramount. Sushi rice, often referred to as “shari” or “sumeshi,” is a short-grain rice renowned for its sticky texture when cooked. This stickiness is vital for the rice to hold its shape, making it ideal for molding and stacking with toppings.
When selecting sushi rice, look for high-quality short-grain varieties, such as Japanese or California sushi rice. These types have a higher starch content, which contributes to the desired texture. Using the right rice not only ensures the integrity of the dish but also enhances the overall eating experience.
Nutritional Benefits of Salmon
Salmon is a star ingredient in this recipe, and for good reason. This fish is not only delicious but also packed with nutrients that promote health and well-being. Rich in omega-3 fatty acids, salmon supports heart health by reducing inflammation and lowering blood pressure. It’s also an excellent source of high-quality protein, which is essential for muscle repair and growth.
In addition to its health benefits, salmon’s buttery flavor complements the crispy rice perfectly, adding a luxurious touch to each bite. The freshness of the salmon elevates this dish, making it a nutritious choice without compromising on taste.
The Importance of Seasoning in Japanese Cuisine
In Japanese cuisine, seasoning plays a pivotal role in enhancing the natural flavors of ingredients. For Salmon Crispy Rice, the seasoning of the sushi rice is a critical step that cannot be overlooked. The combination of rice vinegar, sugar, and salt not only adds flavor but also imparts a subtle tanginess that balances the richness of the salmon.
– Rice Vinegar: This ingredient is key in giving sushi rice its characteristic taste. Rice vinegar is milder than regular vinegar and adds a delicate sweetness that complements the dish.
– Sugar: A touch of sugar helps to balance the acidity of the vinegar, ensuring that the rice is flavorful yet not overly sweet.
– Salt: Finally, a pinch of salt enhances the overall flavor, making each bite of the sushi rice more enjoyable.
Optional Ingredients: Elevating the Dish
While the core ingredients are vital for crafting the perfect Salmon Crispy Rice, optional ingredients can further elevate the dish. Ingredients such as avocado and sriracha can be added for additional flavor and texture:
– Avocado: Creamy and rich, avocado adds a smoothness that contrasts beautifully with the crispy rice. It also contributes healthy fats, making the dish even more nutritious.
– Sriracha: For those who enjoy a little heat, a drizzle of sriracha can bring an exciting kick to the dish, enhancing the overall flavor profile.
These optional ingredients allow for personalization, making it possible to cater to various tastes and preferences.
Preparation of Sushi Rice
Creating the perfect sushi rice is a vital step in achieving the desired texture and flavor in your Salmon Crispy Rice. Follow these detailed steps to prepare sushi rice that is both sticky and flavorful.
Step 1: Rinse the Sushi Rice
Rinsing sushi rice is essential to remove excess starch, which can lead to gummy rice. Begin by measuring out your desired amount of sushi rice (typically around 2 cups for a serving of Salmon Crispy Rice). Place the rice in a large bowl and fill it with cold water. Gently swirl the rice with your fingers, then drain the water. Repeat this process several times until the water runs clear. This step is crucial for achieving the right texture, ensuring that your rice is sticky but not overly clumpy.
Step 2: Cook the Sushi Rice
After rinsing, it’s time to cook the sushi rice. Transfer the rinsed rice to a rice cooker or a saucepan. Add the appropriate amount of water—this is usually a 1:1 ratio of rice to water for sushi rice. If you’re using a rice cooker, simply follow the manufacturer’s instructions. If cooking on the stovetop, bring the water to a boil, then reduce the heat to low, cover the pot, and let it simmer for about 15-20 minutes. Once cooked, remove the rice from heat and let it sit, covered, for an additional 10 minutes to steam.
Step 3: Season the Rice
While the rice is resting, prepare the seasoning. In a small bowl, mix together rice vinegar, sugar, and salt. The typical ratio for seasoning sushi rice is about ¼ cup of rice vinegar, 2 tablespoons of sugar, and 1 teaspoon of salt, but you can adjust these amounts based on your taste preferences.
Once the rice has finished resting, transfer it to a large bowl or a wooden sushi tub (called a hangiri). While the rice is still warm, pour the seasoning mixture over the rice. Using a wooden spatula or paddle, gently fold the seasoning into the rice, taking care not to mash the grains. The goal is to evenly distribute the seasoning while maintaining the rice’s fluffy texture.
Step 4: Allow the Rice to Cool
After seasoning, let the sushi rice cool to room temperature. This cooling process can be expedited using a handheld fan or simply allowing the rice to sit at room temperature. Avoid refrigerating the rice, as this can alter its texture and make it less suitable for crispy rice preparation.
Cooking the Salmon
Once your sushi rice is prepared, it’s time to focus on cooking the salmon. The right cooking technique will enhance the flavor of the fish and ensure that it pairs beautifully with the crispy rice base.
Cooking Techniques for Salmon
There are several methods for cooking salmon, each yielding delicious results. Here are a few popular techniques:
– Grilling: Grilling salmon adds a smoky flavor that complements the dish beautifully. Preheat your grill and lightly oil the grates. Place the salmon fillets skin-side down and grill for about 4-5 minutes per side, depending on the thickness of the fillets. Brush with soy sauce and sesame oil during cooking for added flavor.
– Searing: Searing salmon in a hot skillet creates a crispy exterior while keeping the inside tender. Heat a tablespoon of oil in a non-stick or cast-iron skillet over medium-high heat. Season the salmon fillets with salt and pepper, then place them skin-side down in the skillet. Cook for about 4-5 minutes, then flip and cook for an additional 3-4 minutes. This method can also benefit from a drizzle of soy sauce and sesame oil for depth of flavor.
– Baking: For a healthier option, baking salmon is a simple and effective method. Preheat your oven to 375°F (190°C) and place the salmon on a lined baking sheet. Season with salt, pepper, soy sauce, and sesame oil, then bake for about 12-15 minutes, or until the salmon is cooked through.
Achieving the Right Doneness
The key to perfectly cooked salmon is achieving the right level of doneness. Salmon can be enjoyed at various levels of doneness, from rare to well-done, but a medium doneness is often preferred for its moist and tender texture. The fish should flake easily with a fork while still being slightly translucent in the center.
Using a food thermometer can help ensure accuracy, with an internal temperature of 125°F (51°C) for medium doneness. Remember that the salmon will continue to cook slightly after being removed from heat, so it’s a good idea to take it off when it’s just shy of your desired temperature.
Flavor Enhancements with Soy Sauce and Sesame Oil
To elevate the flavor of your salmon, consider marinating it briefly in a mixture of soy sauce and sesame oil before cooking. This not only infuses the fish with umami richness but also complements the crispy rice’s seasoning. Simply combine equal parts soy sauce and sesame oil, and let the salmon marinate for 15-30 minutes before cooking.
Substituting Salmon with Other Proteins
While salmon is a fantastic choice for this recipe, there are several alternative proteins that can be used to create a similar dish. Consider trying:
– Tuna: A popular sushi choice, seared or raw tuna can be a great substitute. Ahi tuna, in particular, works well with crispy rice.
– Shrimp: Cooked shrimp can be sliced and placed atop the rice for a seafood twist.
– Tofu: For a plant-based option, marinated and grilled tofu can provide a similar texture and flavor profile.
By understanding the ingredients and preparation techniques, you can create a delicious and visually stunning Salmon Crispy Rice that will impress your family and friends. The combination of sushi rice and perfectly cooked salmon, along with the optional toppings and seasonings, make this dish a versatile and delightful addition to any meal. Stay tuned for the next steps to complete this culinary masterpiece.
Exploring Options Like Tofu or Shrimp for Different Dietary Preferences
When it comes to creating a versatile dish like Salmon Crispy Rice, adaptability is key. For those who may not eat salmon or are looking for alternative protein options, consider using tofu or shrimp. Both ingredients can provide unique flavors and textures that complement the crispy rice base.
Tofu is an excellent plant-based substitute. Firm tofu holds its shape well and can be marinated to absorb flavors before frying. Simply cube the tofu and sauté it until golden brown, giving it a delightful crunch. The marinating process can involve soy sauce, sesame oil, and a touch of garlic or ginger to enhance the umami flavor profile.
Shrimp is another fantastic alternative for seafood lovers. Lightly seasoned and sautéed shrimp can add a sweet and briny essence to the dish. Ensure that the shrimp are cooked just until they turn pink and opaque to maintain their tender texture.
By offering these alternatives, everyone can enjoy the deliciousness of crispy rice patties topped with their preferred protein choice.
Creating Crispy Rice Patties
Step-by-Step Guide for Shaping and Frying Crispy Rice
1. Prepare Your Rice: Start with short-grain sushi rice or leftover rice. If using fresh rice, cook it according to package instructions, then allow it to cool slightly. The rice should be sticky enough to hold together when shaped.
2. Shape the Patties: Wet your hands to prevent the rice from sticking. Take a handful of rice and shape it into a small patty, roughly 2 inches wide and half an inch thick. Repeat until all the rice is shaped into patties.
3. Fry the Patties: Heat a non-stick skillet over medium-high heat and add a thin layer of vegetable oil. Once the oil is hot, carefully place the rice patties in the skillet, ensuring not to overcrowd the pan. Fry for about 3-4 minutes on each side, or until they achieve a beautiful golden brown color.
Importance of Moisture Control and Frying Technique
The key to achieving perfectly crispy rice patties lies in moisture control. If the rice is too wet, the patties will be soggy and difficult to fry. Conversely, if the rice is too dry, it won’t hold together. Ensure your rice is sticky but not overly wet before shaping.
Additionally, maintaining the right frying technique is crucial. A moderate heat setting allows the patties to cook through without burning, ensuring a crispy exterior and a warm interior.
Benefits of Using a Non-Stick Skillet for Frying
Using a non-stick skillet greatly enhances your frying experience. It reduces the amount of oil needed and minimizes the risk of the rice patties sticking to the pan. This ensures you can flip the patties easily without losing their shape or texture.
Tips for Achieving the Ideal Golden Crust
– Patience: Avoid flipping the patties too soon; let them cook undisturbed for a few minutes to form a proper crust.
– Oil: Use enough oil to create a shallow layer in the skillet. This helps achieve an even crispiness on all sides.
– Batch Cooking: Fry the patties in batches to avoid overcrowding, which can lower the skillet’s temperature and prevent even cooking.
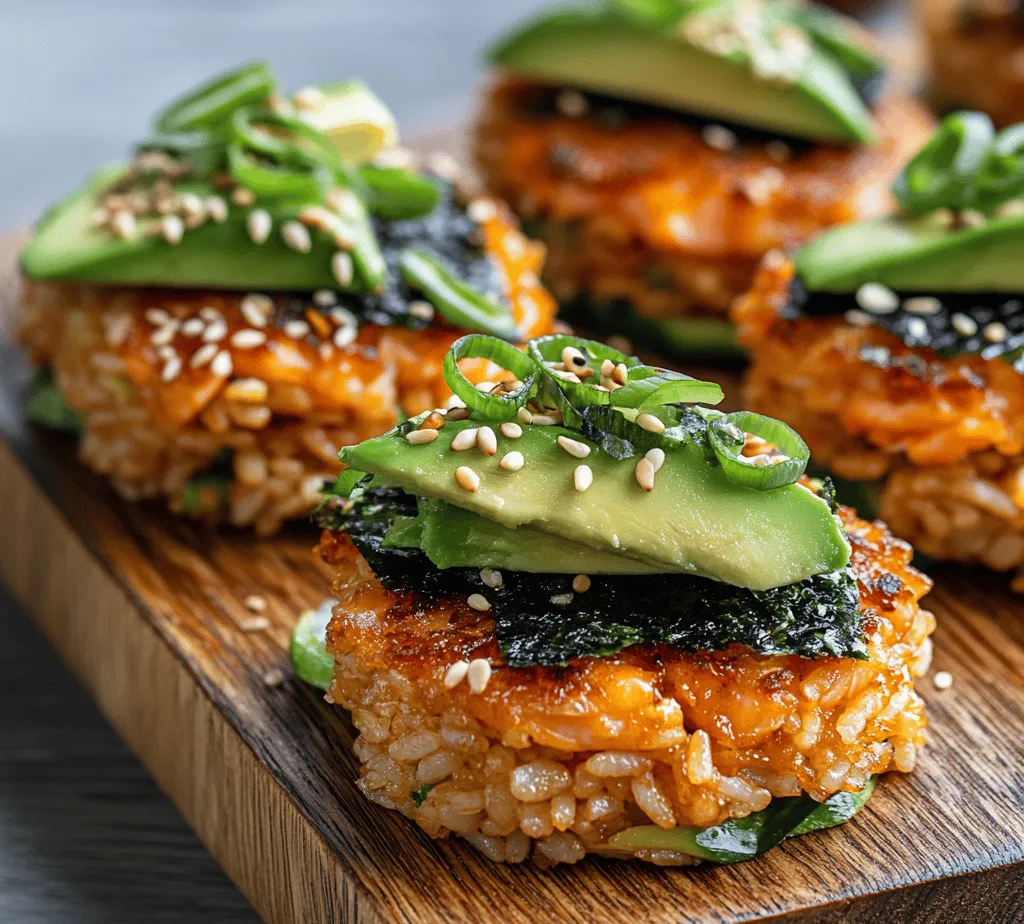
Assembling the Salmon Crispy Rice
Once your crispy rice patties are ready, it’s time to assemble the Salmon Crispy Rice, layering flavors and textures for a delicious final dish.
Detailed Instructions for Layering Flavors and Textures
1. Flake the Salmon: If you’ve cooked your salmon, allow it to cool slightly before flaking it with a fork. Aim for bite-sized pieces that can easily sit atop the rice patties.
2. Prepare the Sauce: A drizzle of soy sauce or a spicy mayo can enhance the dish significantly. To make spicy mayo, mix mayonnaise with sriracha or chili paste until you achieve your desired heat level.
3. Layering: Start by placing the flaked salmon on top of each crispy rice patty. Next, drizzle with the sauce of your choice, ensuring each patty is well-coated but not drenched.
Tips on How to Best Flake the Salmon and Arrange Toppings
– To flake the salmon easily, use a fork and work from the thicker end towards the thinner side. This method helps you achieve nice, flaky pieces without tearing the fish apart.
– For an appealing presentation, arrange the salmon neatly on the patties, ensuring even distribution across all servings.
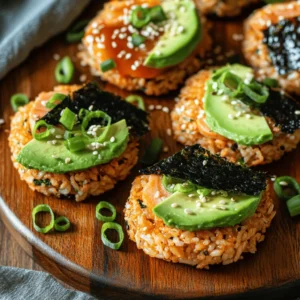
The Role of Garnishes in Enhancing Presentation and Taste
Garnishes play a crucial role in both the appearance and flavor of your dish. Fresh green onions, toasted sesame seeds, and nori strips can elevate the visual appeal and add extra flavors.
– Green Onions: Finely chop them and sprinkle generously over the salmon for a fresh, oniony bite.
– Sesame Seeds: Toasted sesame seeds add a nutty crunch. Simply toast them in a dry pan until golden before adding.
– Nori Strips: Cut nori sheets into thin strips and use them as a garnish to introduce a seaweed essence and a touch of elegance.
Serving Suggestions
Presentation is key when serving your Salmon Crispy Rice, as it enhances the overall dining experience.
Best Practices for Presenting Salmon Crispy Rice
– Use a large, white plate for a clean backdrop that makes the colors of the dish pop.
– Arrange the patties in a circular pattern or a neat line, ensuring they are spaced evenly.
– Drizzle sauces artistically over the patties and scatter garnishes around for an appealing finish.
Ideas for Side Dishes or Drinks That Pair Well with the Dish
To complement the flavors of Salmon Crispy Rice, consider serving it with:
– Miso Soup: A warm bowl of miso soup can be a comforting companion.
– Edamame: Lightly salted edamame provides a simple and nutritious side.
– Cucumber Salad: A refreshing cucumber salad dressed in rice vinegar can balance the richness of the salmon.
For drinks, green tea or a light sake can enhance the meal’s Japanese influence and provide a pleasant contrast to the dish’s flavors.
Discussion of Serving Temperatures and Timing
Salmon Crispy Rice is best served warm, right after assembly. The contrast between the hot crispy rice and the tender salmon creates a delightful texture experience. Allow the patties to cool slightly after frying, but serve them as soon as they are topped to ensure the best taste.
Why Serving Immediately Ensures the Best Experience
Serving the dish immediately after assembly ensures that the crispy texture of the rice patties is maintained. If left too long, the patties can absorb moisture from the toppings, leading to a soggy experience that diminishes the dish’s appeal.
Nutritional Information
Understanding the nutritional composition of your dish can enhance your culinary experience.
Breakdown of Calories and Nutrients Per Serving
A serving of Salmon Crispy Rice typically contains around 350-400 calories, depending on the portion size and specific ingredients used. Here’s a rough breakdown:
– Protein: Salmon is an excellent source of protein, providing around 25 grams per serving.
– Carbohydrates: The rice contributes about 45 grams of carbohydrates, offering energy.
– Fats: With the addition of cooking oil and salmon, expect around 15 grams of healthy fats, primarily from omega-3 fatty acids.
Health Benefits of Each Key Ingredient
– Salmon: Rich in omega-3 fatty acids, it promotes heart health and supports brain function.
– Rice: A source of energy and essential carbohydrates, it’s also gluten-free.
– Garnishes: Ingredients like green onions and sesame seeds add vitamins and minerals, enhancing the overall nutritional profile of the dish.
Importance of Balanced Meals and Incorporating Seafood
Incorporating seafood into your diet is crucial for a balanced meal. Seafood, particularly fatty fish, is linked to numerous health benefits, including reduced inflammation and improved cardiovascular health. Pairing it with whole grains like rice ensures a meal rich in fiber and nutrients.
Conclusion
Salmon Crispy Rice is not just a dish; it’s an experience that combines texture, flavor, and visual appeal. The balance of crispy rice, tender salmon, and vibrant garnishes creates a culinary delight that is sure to impress both family and friends.
Whether you’re exploring this recipe for a casual dinner or a special occasion, the unique qualities of Salmon Crispy Rice make it a standout choice. We encourage you to embrace the joy of cooking, experiment with flavors, and share this delightful dish with your loved ones. Cooking is not just about food; it’s about creating memories and enjoying the process together. Dive into this recipe and relish the wonderful balance of flavors that await!